
Since moving in our home a little over a year ago, we have done several DIY projects together as a family. Most of which I regret not documenting. My favorite project to date was the dining room table we built as a family. I did capture a few of the special moments of us building as a family but I certainly wish I had more of the process to share with you all.
Anyway, all feelings aside, I had never had a table like this before. It’s approximately 7 ft long and can seat up to 8 people. Needless to say, that is A LOT of space to fill when trying to curate a beautiful tablescape. I love the way the dining area looks with the table all set up and pretty for the season but place settings for that many people can become expensive very quickly.
I have to get pretty thrifty to make something like this work for our budget and trust me…if I can do it you certainly can too! This is the collection of things I found around my house that had a natural feel.

Step ONE: TEXTILES
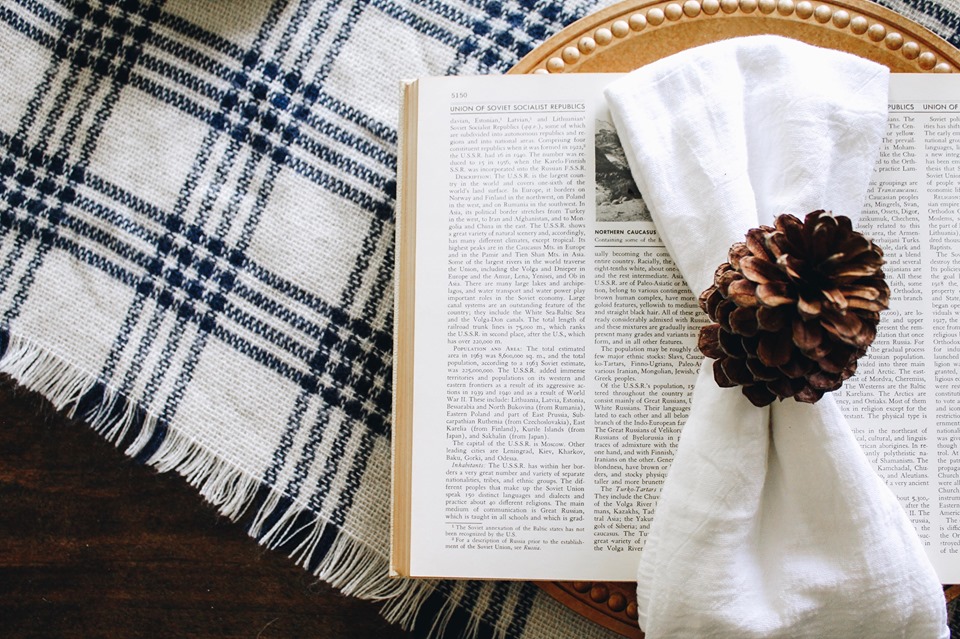
I want to encourage you to step outside of your box on this one. It is easy to assume that you need a tablecloth or runner to create the perfect tablescape…FALSE! The truth is, there are MANY options! In this case I used a blanket scarf from the Goodwill for $3.99.…yep I used a scarf! There are sooo many forgotten textile in second hand stores its unreal. Go on a hunt, look for fall colors, patterns or just anything that speaks to your heart.
I loved the pattern and frayed edges of this one. I angled it slightly just for fun, it doesn’t have to cover every edge,. Trust me, allowing your beautiful wood to show isn’t going to take away from this eclectic look!


Step TWO:LAYERS
This is where the magic happens. I usually always start with placemats but believe it or not they are not always necessary. In this case, I had some chargers that I found at the Dollar Tree! I loved the bubble trim detail and the perfect golden color screams fall. Please DO NOT spend an arm and a leg on chargers. There are plenty of options at dollar stores and Hobby Lobby that wont break the bank.

Another element I wanted to add for layering was old books. My vision was for a very natural feel to this look. The aged color of the pages and printed text just brought this cozy, well-worn vibe to the table. So, rather than my bright white dishes I opted for using an old set of encyclopedias for layering. I snagged 13 of these for $2.50! (I just recently discovered a thrift store in my hometown that just gives them away fro FREE!)
Simply lay them out on your charger.…oh my goodness isn’t that charming? I felt like it removed the need for a plate but still added a much needed layer, plus they double a good conversation starter.

Step THREE: NAPKINS
This step is a no brainer. What is a tablescape without napkins? Right? But you see here’s the thing…napkins can get expensive. I opted for plain white tea towels from the Walmart kitchen area. I forget the exact cost but they were somewhere around .98 cents each! These could easily be spruced up with some stencils and paint. I’m even thinking of going back and tea-soaking them just to age em’ a bit.
I chose a solid, neutral color so it didn’t make the space too busy. The chunky pattern of the scarf adds plenty of character without making it too busy.
I fashioned make shift rings from paper floral wire. Simply snip, wrap and twist your wire around the napkin. This look can easily be accomplished with jute twine or even a little bit of raffia.


Place your napkins in the crease of your book!

Step FOUR: NAME CARDS
I use the term “name card” loosely. I don’t literally mean place name cards on your settings. What I really mean is “that little something extra to add a special touch” Whether it’s an actual name card written on a tiny chalkboard, wooden cutout letters, little individual pumpkins, or in this case, pinecones; it’s just that little extra special element that really brings the look together. I loved the pinecones for this step because again we’re talkin CHEAP! I literally snagged these from my sisters yard and placed then centered on top of the napkins.

Step FIVE: CENTERPIECE
This is your final and perhaps the most vital part of creating the perfect fall tablescape. Maybe I am doing this all backwards, I don’t really know, but for me personally I like starting with the settings first so I can visually see how much space I am working with in the center.
Go on a scavenger hunt around your home looking for things that say “natural” Some examples might be, sticks, antlers, flowers, gourds, pumpkins, pinecones, ect
Mix your findings in with other elements like vases, candle sticks, or naturally worn books to give it an eclectic feel. Think variants in height, textures and color!


-PIN FOR LATER-


[…] Needless to say, the TV is back above the mantle and now I have a whole new idea for a shiplap feature to frame it in….but that’s a story for another day. For now, I get to enjoy learning how to style a vintage mantle! The simplicity of the pumpkins in different shapes, colors and textures mixed with a bit of garland gave it a natural vibe that coordinates well with my Natural Fall Tablescape. […]
[…] If you’re not quite ready for this Halloween place setting check out this beautiful fall table using the same shop your home method HERE […]
Comments are closed.